
10 Tips to Improve Your Drone Photography


There has never been a time quite like the present. In this day and age, aerial photography is so accessible that almost anyone can photograph the landscape from the sky.
- Check out this Ultimate Guide to Instagram for Landscape Photographers
- Explore these articles on Aerial and Drone Photography
- Discover this Namibia Wildlife Photography Tour
Over the past few years, drone technology has advanced rapidly, changing the way that we view the world. Without taking our two feet off the ground, we are able to visit and to capture aerial images of the most incredible locations on the planet.
However, flying a drone is not without its challenges. Whether you’re planning to get into drone photography or you’ve already purchased one, it’s important to understand the capabilities of your drone so that you can capture stunning images.
I’ve been so excited by drone technology that I actually own two small drones, the Mavic 1 Pro and Mavic 2 Pro, which I take with me on photography tours and workshops. They fit well into my backpack and give me a whole new perspective once I’ve exhausted compositions on the ground.
I love drone photography and have been capturing aerial images for quite a while now, so I thought I’d share with you my top 10 tips which will help to improve your drone photography.
- See also: An Introduction to Drones
Tip #1. Scout for Locations to Fly
Before you even go outside, you can actually spend some time scouting for locations to fly. Drone photography involves knowing where you can fly in the first place, so it’s important that you spend a bit of time doing some research.
First of all, you can use Google Earth as a tool to figure where you’d like to fly your drone. The great thing about Google Earth is that there’s a 3D function, which allows you to see intricate details on the map, including where you live.
 Scout for locations on Google. Photo by: 'Albert Dros'.
Being able to explore the map in 3D gives you the ability to look at possible locations for drone photography from different angles. This way, you’ll have a fair idea of how the landscape in your shot might look from above, before you even head out to take the photo!
By using Google Maps for scouting, you’ll also be able to jot down information about the altitude that you’ll need to take the shot, which is helpful when you’re actually out there flying.
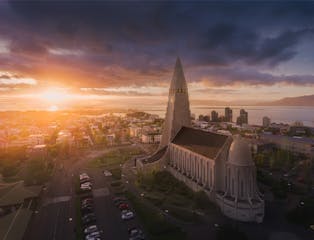
Tip #2. Know When to Fly
Weather conditions are always changing, so it’s important that you stay up-to-date with the latest information and continue to monitor it while you’re flying your drone.
The best weather for flying a drone is when there is good lighting outside with little wind. Wind can make flying really difficult and can lead to your batteries draining a lot faster as you use energy trying to keep the drone steady. Cold temperatures, particularly during winter in places like Iceland and Greenland, can also lead to your batteries losing charge more quickly.
 Fly in appropriate conditions. Photo by: 'Albert Dros'.
There’s nothing to hold you back from flying in these conditions though, unless it’s so windy that you can’t take off or even land, or if your batteries have gone flat before you’ve even started. Just be mindful that it’s not completely safe to fly in this type of weather. It’s also not a good idea to fly your drone when it’s snowing or raining, as precipitation can damage the electronics.
Having said that, interesting weather conditions can result in some amazing drone photography. I love flying around fog, which can create a magical and enchanting effect. Another good time to fly is when there is some backlighting, which can create long shadows in the landscape.
Tip #3. Plan Your Shoot
No matter how great the weather is for flying, the secret to capturing an amazing drone shot is to shoot a location with an interesting composition. This is where the planning comes in.
Strategically captured drone shots often have that ‘wow’ factor that other aerial photographs don’t. The composition appears to be spot-on, the subjects stand out and even the colours appear to be complementary.
 Plan your shoot. Photo by: 'Albert Dros'.
You’ll be surprised at how more often than not, the best drone photographs are planned out to a tee, rather than being captured randomly.
 The same image in reality! Photo by: 'Albert Dros'.
A smartphone app that I like to use for planning my shoots is PhotoPills. Recently, a new feature was introduced into the app called ‘drone module’. This not only allows you to scout the landscape as you would with Google Earth, but you can actually obtain even more data to help you to plan your shoot more precisely. You can even get an accurate field of view, so you’ll know exactly what the shot will look like with everything aligned, before you even take it!
Another reason that I like this app is that you can save the information that you’ve downloaded to use later, by using a pin on the map. That way, you can actually use the app to map you out to those locations later on. Once you get there, you’ll have all of the data that you need to set up for your drone shot.
Tip #4. Experiment with Height
When flying your drone, keep in mind that there will often be restrictions on how high you can fly, depending on the area. Also, flying as high as possible isn’t always a great idea.
With aerial photography, it can be difficult to find a good composition when there’s so much going on in the landscape below. The higher up that you fly, the more that you’ll include in the frame. The result is that your image can look cluttered.
 Try flying lower. Photo by: 'Albert Dros'.
Rather than trying to get everything into the one shot, try flying your drone a little bit lower, or getting closer to your subject. Doing so will allow you to tighten the composition, which can be more pleasing to the eye.
Of course, your perspective of the landscape below will change, depending on the height that you fly. The distances between objects can appear to be smaller or even larger, which will affect how they appear within the frame as well as the depth of field. So when in doubt, just experiment with the height. There’s no need to get your drone up as high in the air as you can during every flight.
Tip #5. The Rule of Thirds
Making a good picture with a drone is similar to capturing the landscape on the ground. The key to a really successful drone image is to find an epic composition.
When composing your shot, keep the Rule of Thirds in mind. If your drone settings allow you to, then switch on the grid so that you can easily position elements within the thirds of your frame.
As with normal landscape photography, explore the area with your drone and look for leading lines that will guide your viewer’s eye around the frame to the most important elements. For example, rivers can act as great leading lines into mountains and other objects within the landscape. Place the objects at the intersections of the thirds and use the lines to lead the eye into and around the image.
 The Rule of Thirds is an important compositional tool. Photo by: 'Albert Dros'.
By using the Rule of Thirds, you’ll be able to keep your audience focused on looking at your images for much longer. It’s also much more satisfying to take in a well-composed shot than to try to make sense of the clutter on your own.
While getting a great composition while you’re flying isn’t going to be easy, practice makes perfect and you’ll get better at it the more that you try.
- See also: Rule of Thirds Explained
Tip #6. Try Making a Panorama
Did you know that most drones on the market don’t use ultra wide angle lenses? Usually you won’t need one for aerial photography, as you’ll probably want to zoom in on certain objects in the landscape anyway, particularly if you’re making abstract shots.
However, there may be times that you’ll want to fit more than you can into a single frame. This might occur when you’re faced with a really grand vista, such as an enormous glacier tongue emerging from the mountains. Rather than being disappointed and letting the image slip through your fingers, you can capture the entire expanse of the landscape in a panorama instead.
 A panorama makes for more interesting drone photography. Photo by: 'Albert Dros'.
Panorama photography with a drone is much easier to do than you’d think. Most drones come with an in-built panorama function, which will do a lot of the work for you! Simply select the option that you want and your drone will take the panorama automatically. I like to use the full sphere option, which allows me to capture everything quite quickly. I save the panorama images from my drone as RAW files which I can edit later on.
When I get home with the shots, I can view all of the images and choose the perfect parts from within the giant panorama which I’ll use as my final shot. I then stitch the images together using software such as Adobe Lightroom, Photoshop or PTGui.
Making drone panoramas is fun and easy to do, so try this the next time that you go out!
Tip #7. Use the Best Settings
Once you’ve got your drone in the air and found the perfect composition, it’s time to take the shot. It might feel like a whole different ball game when you’re taking a picture with your drone rather than through your DSLR camera but really, the correct settings to use are not that difficult to figure out.
The camera on your drone is probably not going to produce images of as high quality as your DSLR. That doesn’t mean that you can’t get incredible images. What it does mean is that you’ll need the right settings to get the perfect shot.
 Use the best settings to minimise noise. Photo by: 'Albert Dros'.
To minimise noise, always shoot at ISO 100. Next, you’ll want to adjust the aperture to somewhere around f/4-f/5.6. Some drones won’t allow you to do this, though the DJI Mavic 2 and Phantom 4 will. While this aperture might seem a little too wide to get a sharp image, shooting at a smaller aperture such as f/11 can result in image softness and poor quality.
While you’re up in the air, you can actually still use filters, so try experimenting with neutral density filters for drones. DJI has a number of filters made specifically to fit their drones, which will reduce the amount of light coming into your drone camera’s sensor. You can even use a polarising filter to cut out reflections, which can give you some amazing results when photographing large bodies of water. Imagine seeing through the water to photograph the bottom of a lake! This can make for some truly breathtaking shots.
Tip #8. Refer to the Histogram
With normal landscape photography, you learn pretty quickly that the image on the back of your camera may not always be as bright or as dark as it seems. Well, you’ll be interested to know that the same goes for drone photography.
Depending on the lighting in the scene, what you see on the screen of your controller won’t always correspond to the image that you bring up on your computer monitor when you get home. To take the guesswork out of getting a proper exposure, you can simply refer to the histogram which will tell you if there is any clipping in your highlights or shadows.
If there is, then you can set your drone to take some automatically bracketed shots, or do some manual bracketing. This means that your drone will take several images of different exposures, which you can combine later on during post-processing to make the most of the entire dynamic range.
 Refer to the histogram to check your exposure. Photo by: 'Albert Dros'.
While manual bracketing may sound difficult at first, it’s not actually that hard to do. Your drone will hover in place as you do it, so you’ll just need to adjust your settings for the exposure. There are times when manual bracketing will be more effective than allowing your drone to do it automatically, such as when you’re photographing into the sun.
Tip #9. Stack Images to Reduce Noise
Even when you’re using ISO 100 with your DJI Mavic Pro, the sensor is quite small so you’ll still end up with some amount of noise in your drone images. This can be made all the more evident when you get around to processing your shots.
There is a trick that I like to use for drone photography which I call ‘noise stacking’. This technique allows me to reduce the noise in my images quite significantly, especially when I’m shooting in darker environments
It involves shooting in Burst Mode, during which the drone takes five consecutive shots quite quickly using the same settings. The resulting images should be almost identical. What you probably won’t be able to see though upon first inspection is that each of the images will have a different underlying noise pattern.
You can then combine these five images with post-processing software to get rid of the noise. To do this, you simply need to stack the images together. The software will then average out the noise within all five images, in order to produce a single less noisy shot.
Here are the basic steps for noise stacking:
-
Step 1: Select the 5 photos in Lightroom -> Right click -> Open as layers in Photoshop
-
Step 2: Select all the 5 layers in Photoshop -> Edit -> Auto Align. This will auto align the images incase the drone slightly moved during taking the images.
-
Step 3: Select all 5 layers -> right click -> Convert to smart object.
-
Step 4: Layer -> Smart Objects -> Stack mode -> Mean
It really is as easy as that!
 Stack images to reduce noise. Photo by: 'Albert Dros'.
Tip #10. Be Confident
Last but not least, my final tip to improve your drone photography is to be confident. When you first start flying, you might feel anxious about getting that expensive piece of equipment up into the air. You might even baulk at flying it too far away, in case it suddenly falls out of the sky and there’s no way for you to rescue it.
I had these concerns too when I first started flying my drone and there was only one way for me to be comfortable with flying, which was to fly my drone often.
While these thoughts are still sometimes at the back of my mind, these days I understand what my drone is capable of so I trust it a lot more when I’m out in-field. If it appears to be losing signal or if there are some other problems occurring, I know that when I hit the ‘Return to Home’ button, it will always come back.
About the author: Albert Dros is a landscape photographer based in the Netherlands. You can find more of his work on his website or by following him on Facebook and Instagram.
Can't get enough of aerial and drone photograph? Check out our Ultimate Guide to Drone Vacations!


Other interesting articles

Should I Take My Drone to Iceland?
As a keen aerial photographer, the first thing you’re probably wondering is, ‘Can I take my drone to Iceland?’ The answer to that is yes. Yes you can. It will not be confiscated at Customs and you w...Read more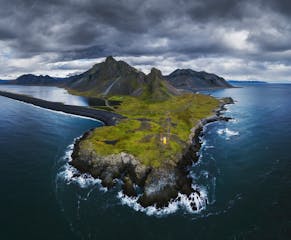
What Are the Rules For Flying a Drone in Iceland?
As drones have gotten smarter and miniature cameras have become more sophisticated, the rise of aerial photography has been inevitable. No matter where you are in the world, if it’s a photogenic des...Read more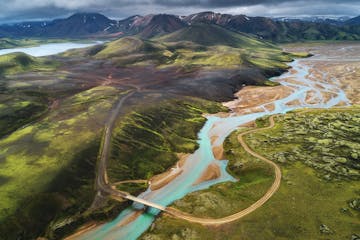
DJI Mavic 2 Pro Review
In the summer of 2018, DJI launched a pair of drones that got aerial photographers all over the world talking: The Mavic 2 Zoom and the Mavic 2 Pro. Discover 5 Reasons Why Iceland is the Best D...Read more


