
11 Tips to Help You Capture Stunning Landscape Photographs

- Tip #1. Consider What Inspires You
- Tip #2. Research the Location Before You Go
- Tip #3. Lighting Conditions Matter
- Tip #4. Take Your Time to Compose
- Tip #5. Choose a Background
- Tip #6. Choosing a Foreground
- Tip #7. A Tripod is Your Best Friend
- Tip #8. Shoot in RAW
- Tip #9. Be Familiar With Your Equipment
- Tip #10. Learn to Process Your Photos
- Tip #11. Consider Your Safety
- Most importantly...

Landscape photography is arguably one of the most inspiring genres of photography out there. There’s nothing quite like gazing upon a photograph of a majestic landscape that’s been beautifully captured in a single frame. However, it is also one of the most toughest genres of photography to be successful at. Conditions can often be difficult, uncomfortable, uncooperative, and most of all, intimidating.
- Check out How to Become a Professional Landscape Photographer
- Explore these articles on Photography Techniques
- Discover 5 Composition Techniques That Will Improve Your Landscape Photography
For beginners, looking back over your photographs after a session can leave you feeling deflated. And more often than not, looking back over what you envisioned you would capture and what you did capture, don’t exactly match up. But with patience, practice, perseverance and most of all, passion, achieving that vision eventually becomes a reality.
Landscape photography is all about capturing Mother Nature at her best, and capturing the beauty of this planet in a single inspirational frame.
Tip #1. Consider What Inspires You
It’s important to take the time to consider what it is exactly that inspires you about landscape photography. Understanding your passion will go a long way to help you develop your photography skills.
Often, a big help can be to study those images of the photographers you aspire to, as each photographer tends to have their own style. What is it about their images that you like? Look at their composition, lighting, and type of processing the photographs have undergone. Study these photographs and the next time you're in the field, in a way, try to replicate the same style.
An interesting way to look at it, is to consider learning a new musical instrument. You don’t go straight into orchestrating your own music. You learn to play the songs you already like first, and the same can be done with photography.
Tip #2. Research the Location Before You Go
Spending a little time to research your location prior to heading out into the field can go a far way towards helping you bring home something you’ll be proud of. Get on Google Maps and scout satellite images of where you’ll be shooting. An aerial view of the area can reveal landscape characteristics which you can’t necessarily see from the ground. This can help get you to where you want to be a lot sooner, and save you a lot of time scouting on site.
There are also computer and phone apps (such as PhotoPills) that will give you sun and moon directions, along with the rise and set times.
 Plan your shoots by doing some research beforehand. Photo by: 'Clint Burkinshaw'.
Another fantastic strategy is to investigate your planned shooting area on Google Images. Chances are, there are several (or dozens) of photographs that have already been taken there. Seeing what photographs others have taken will also give you great insight and a sense of familiarity to the environment you’ll be stepping in to.
There are plenty of things that you can do in order to get familiar with your upcoming photography destination before you leave the house. Each will save you time on ground and give you a head start towards capturing an image that you’ll be happy with.
Tip #3. Lighting Conditions Matter
The time of day that you conduct your shoot will have a large impact on the mood of your final product. Shooting in the golden hour (just after sunrise and just before sunset) will give you warm soothing golden colours. But keep in mind that this can also increase difficulty if shooting into the sun.
Shooting during the middle of the day has brighter white light, and will give more natural tones to everything in your frame. This can be good for bringing out the greens of foliage, or the blues of water.
Depending on what you’re after, shooting at different times of day will both change the mood and tones of your photograph, so take this into consideration before shooting.
 Shoot in the best lighting possible. Photo by: 'Clint Burkinshaw'.
- See also: Bright Ideas for Shooting in Daylight
Tip #4. Take Your Time to Compose
While there are multiple aspects about your photo that can be improved and fixed in post processing, composition is not one of them (a side from a slight crop). If your photograph is not composed well, there is nothing you can do to fix it later on. This is why taking your time to frame your shot before you press the shutter release button is absolutely vital when it comes to landscape photography.
Generally, the first position you find will not be the best. Instead of being complacent with the easiest place to shoot from, take some time looking around the immediate area for some interesting foreground. Also, consider the height you are shooting from. Will the shot look better lower to the ground, or is there a vantage point nearby that will get you up higher? Investigate, try different positions and experiment with what you use in the foreground and background.
Tip #5. Choose a Background
Not always, but quite often, considering your background first will give you a head start on figuring out what type of mood and impact your photograph will have. The image background, more often than not, will be the point where the viewer's eyes will end up, so it’s important to select this wisely.
Knowing what your main focus is going to be also helps to decide where and what your foreground might consist of. So whether you decide on having a background as a colourful cloud bursting sunset, a distant mountain or cascading water, know that it is often going to be the main focal point. So be prepared to frame the rest of the shot around presenting this in a pleasing way.
Of course, not 100% of your landscape photographs are going to have a background as a main subject. However, careful consideration as to where your viewers eyes will end up goes a huge way in achieving a great end result and is sure to enhance your photograph considerably.
Tip #6. Choosing a Foreground
While I have emphasised how important the background is to your final product above, this by no means cheapens the importance of a good foreground. Your foreground is often the very first thing a viewer will look at, and it is very true what they say; first impressions last.
Having a strong background and a weak foreground will diminish the final impact the photograph has on the viewer. So, while it can often be quick and easy to decide on what you want your background to be, picking a foreground is often far more difficult, and it’s crucial that you pick wisely.
A foreground has to complement the background, and a really good foreground will successfully link the viewer’s eye from the front to the back (so to speak). There are many ways in which one can get a foreground to complement the background, and a popular way of doing this is by using ‘leading lines’.
An entire article can be written on leading lines, but in summary; leading lines consists of an object or a series of objects which extend from the foreground towards the distance and provide a natural flow for the viewers eye to move between the foreground and background. While leading lines don’t always need to be a part of the foreground, it’s something to keep in mind when looking for them.
Other objects, such as plants, rocks, puddles of water, or shorelines, can be used strategically to fill the foreground part of the image, and are often an interesting means to provide context to the scene or environment. Foregrounds can also be made up of moving objects which different shutter speeds can enhance, such as water.
Tip #7. A Tripod is Your Best Friend
This is one of the most important pieces of equipment you can carry when shooting landscapes. So important that I’m going to go as far as to say, there’s no point trying to get good at landscape photography without one!
That might be a big claim, but you would be hard pressed to find a landscape photographer who would disagree with that statement.
If you don’t have a tripod, get one! It’s as simple as that. The tripod you will need must be capable of handling multiple times your body plus lens weight in order to be stable. This goes for both the legs and the tripod head. Also, to make life simple, make sure the tripod head is a ball-head.
While camera sensor technology is always improving, it’s always a goal to shoot with the lowest ISO as possible to avoid excessive noise and to keep image quality at a maximum. Shooting at the lowest ISO will also cause a longer shutter speed (assuming all other configurations are kept the same), and if you’re shooting around golden hour or darker, it’s very likely your shutter speed is going to be far longer than what’s possible to hand hold.
This is where a tripod is a necessity. Much of the time, slowing your shutter speed down to half a second or longer is very much desired, as it produces certain effects with moving objects (such as flowing water), which cannot be replicated otherwise.
But for the most basic reason there is, using a tripod will allow you to take your time to compose and focus your frame, increasing your chances to take home a nice crisp image.
Tip #8. Shoot in RAW
If you’re going to process your photographs (which of course you should), it’s always beneficial to shoot in RAW. But first, let's understand the difference between the RAW and JPEG format.
In order to produce a JPEG file, the camera will capture the light and then undergo a small amount of post processing before saving. Commonly, the camera will add a small amount of contrast, saturation, noise reduction and some sharpening, then proceed to disregard data it decides is redundant before compressing the final image, saving it as a JPEG. Each camera will slightly differ, but this is generally what happens.
 Shoot in RAW so that you can post process with the most amount of data later. Photo by: 'Clint Burkinshaw'.
A RAW file is a file format where all the image data has been captured by the camera, unaltered. There is no processing done by the camera before saving, and a true RAW file will have no compression and will not disregard any data. A RAW file is how the camera’s sensor natively captures the scene.
So, if a JPEG image naturally looks better than a RAW file, why shoot RAW? Well, instead of letting the camera do the processing and deciding what part of the image’s data it does and doesn’t want, the idea is that you (the photographer) are to be in control of the processing. The RAW post-processed end product should result in the image being sharper, crisper, with smoother tonal transitions, and more detail in the shadows and highlights.
Tip #9. Be Familiar With Your Equipment
It’s not uncommon in landscape photography for those amazing light conditions to come and go in a matter of minutes. This is why knowing your equipment is absolutely crucial, so when the time comes to capture the scene unfolding in front of you, you can get straight to doing just that.
Knowing your equipment can come in a variety of ways. One is being familiar with your camera's controls. Due to how rapidly conditions can change out in nature, it’s important to know what to adjust and when to adjust it, all within a timely manner.
Being familiar with your camera’s controls means you can concentrate on what you need to do, and not waste time fiddling around with a bunch of dials. Knowing how far you can push certain elements of your equipment is also just as important. Whether you extend your camera’s shutter or open up it’s aperture slightly instead of raising the ISO level is important and can have a huge impact on the final result.
This point is simple, get to know your equipment inside and out, and the chances of taking home a winning image will be a lot higher.
- See also: Camera & Gear Reviews
Tip #10. Learn to Process Your Photos
If you’re shooting landscapes and you want them to be punchy, post processing is a must. Especially if you are shooting in RAW.
Spending a few minutes to bring details out of the shadows or highlights, while adding a little contrast and perhaps some saturation, can go a long way. These minor adjustments will help to enhance a bland scene into an exciting scene.
 Basic post processing techniques will help you to improve your photography. Photo by: 'Clint Burkinshaw'.
It doesn’t matter which post processing software you decide to use – having an elementary understanding of how to conduct basic image processing will help you improve your photography and allow you to make your images pop.
Tip #11. Consider Your Safety
It might sound funny at first, but photography can be a dangerous hobby. Ask any long-term landscape photographer if they’ve had any accidents, injuries or “close calls”, and you can bet every single one of them have.
Shooting on cliff tops, dodging powerful waves, navigating difficult terrain at night, trying to find a composition amidst fast flowing streams and rocky rivers – all are common situations for landscape photographers. Going into the situation unprepared may result in your equipment being damaged, yourself being hurt, or worse… do your research, know your tide times, bring appropriate equipment and consider your safety to be your number one priority.
Most importantly...
In the end, landscape photography is about getting out there and being amongst mother nature’s finest. Whether it’s down your local coastline or up some distant mountain, take your time to absorb your surroundings and enjoy being amidst it all. So get inspired, have fun and never stop learning.
About the author: Clint Burkinshaw is a travel photographer based in Australia. You can find more of his work on his website or by following him on Instagram.
Practice your photography skills in-field and on-location in some of the most inspiring places on Earth. Join one of our photography tours and workshops!


Other interesting articles


11 Tips for Amazing Autumn Photography
Autumn is considered by many photographers as the best season to go out and take pictures. It doesn’t take a genius to understand why. The foliage takes on a beautiful palette of earthy colours, the...Read more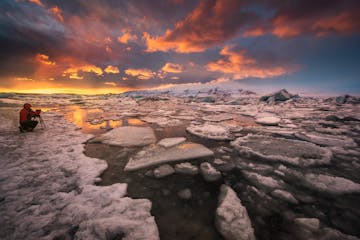
What it's Like to Photograph Iceland in September
These days, everyone knows that Iceland is a premiere destination for photography. However, many of our readers often ask what is the best time to go to Iceland. There is no straightforward answer t...Read more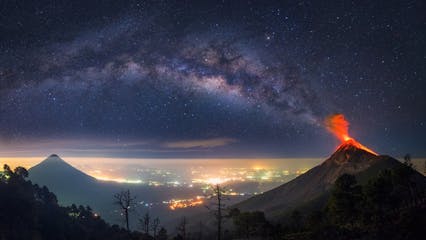
How to Plan for a Successful Landscape Photography Shoot
Creating an epic photo of the landscape usually isn’t just a fluke. Some of the most amazing landscape photography in the world exists only because of meticulous planning. Check out these 25 Usefu...Read more


