Aperture and F-Stop in Landscape Photography for Beginners


One of the questions that we always get asked during our workshops at Iceland Photo Tours is what the best aperture is for landscape photography. Unfortunately, it’s not as easy as us providing an ideal aperture value and leaving it at that.
- Discover The Exposure Triangle: Aperture, ISO & Shutter Speed Explained
- Here are 11 Tips to Help You Capture Stunning Landscape Photographs
- Learn all about Landscape & Nature Photography
The truth is that there is no correct aperture to use – basically, the best aperture to use when photographing the landscape in Iceland depends a lot on your lens, as well as your composition. So if you really want to improve upon your landscape photography in Iceland, let’s explore how you can pick the best aperture to use for your lens, as well as what you are looking to achieve within the scene.
Lens Aperture and Sharpness
First thing’s first – the aperture refers to the size of the opening in your lens which allows the light to enter. The bigger the aperture, the larger the hole and the more light that is able to come in through your lens to reach the sensor of your camera.
This is otherwise known as the f-stop value, which in reality is inversely proportional to aperture value. That is, even though it’s a tiny number, f/2.8 results in a big aperture, whereas f/22 is regarded as a small aperture.
Aside from the amount of light that it lets in, your lens aperture will also help you to control your depth of field. This affects the overall sharpness of your image. Therefore, one of the most important things to consider about the lens that you’ll be using for landscape photography in Iceland is what its optimal aperture is for front-to-back sharpness.
 An optimal aperture for front-to-back sharpness is between f/7.1 to f/13. Photo by: 'Iurie Belegurschi'.
For standard landscape photography in Iceland during the day, the optimal aperture for front-to-back sharpness lies between f/7.1 to f/13. This range is carefully measured and is known universally amongst landscape photographers as the ‘sweet spot’ for your camera lens.
How to Find the Sweet Spot of Your Camera Lens
On the side or at the end of your zoom lens, you may have noticed some strange values that look a little like this: 1:2.8. This value will help you to determine the mid-range of your lens, which in turn will help you calculate its sweet spot.
In this context, the 2.8 refers to the widest (maximum) aperture that your lens can handle. The general rule to determining the mid-range sweet spot of your lens is to count up two or three full f-stops from the widest aperture.
F-stops lie on a sort of exponential scale. The most common f-stop values that our lenses utilise are: f/1, f/1.4, f/2, f/2.8, f/4, f/5.6, f/8, f/11, f/16 and f/22.
Therefore, if your lens value is 1:2.8, then counting up two or three f-stops from 2.8 will give us a sweet spot of between f/5.6 and f/8. On a 16-35mm f/4 lens, the mid-range sweet spot and sharpest aperture would be between f/8 and f/11.
Now that you know how to figure out the mid-range sweet spot and sharpest aperture values of your lens, let’s look at the different scenarios in which to apply them for landscape photography in Iceland.
When to Use a Wide Aperture
Wide or open apertures, described as low f-stop numbers, are typically used to blur backgrounds for a dreamy effect or to create bokeh. For example, if you focus on a puffin in the foreground at a wide aperture of f/2.8, then the puffin will be in focus while the background will be soft and blurred.
 A wide aperture results in a blurred background. Photo by: 'Iurie Belegurschi'.
However, the most important time during which you should use a wide aperture for your landscape photography in Iceland is at night, when the Northern Lights come out to play.
Once you get away from the capital city of Reykjavík, you’ll notice that there isn’t very much light pollution in Iceland. With so little natural light available, you’ll need to increase your ISO, slow down your shutter speed and use an open aperture to capture as much light as possible, meaning that you’ll be able to correctly expose for the Aurora Borealis dancing through the night sky.
Keep in mind though that when shooting at a wide aperture at night (much the same as when you shoot during the day), parts of your image may become blurred, depending on where you choose to focus within the scene itself. This means that you may be exposing correctly for the Northern Lights, but that your foreground may look a little fuzzy if you’ve chosen to focus on something in the distance, like the stars. On the other hand, if you focus on a detail that is closer to your lens, such as a rock, the stars in the sky may seem blurry.
 Use an open aperture to capture as much light as possible when shooting the Northern Lights. Photo by: 'Iurie Belegurschi'.
When to Use a Narrow Aperture
Narrow or closed apertures are most often used in landscape photography when there is significant distance between your foreground and background, but you face the dilemma of wanting as much as possible to be sharp and in focus. Take this example for instance of a horse-rider in front of the staggering Mount Vestrahorn in the east of Iceland.
 Using a narrower aperture keeps both the foreground and background in focus. Photo by: 'Iurie Belegurschi'.
Using a narrow aperture here keeps both the horse-rider and the mountain in the background in focus, without the need for focus-stacking and blending later on.
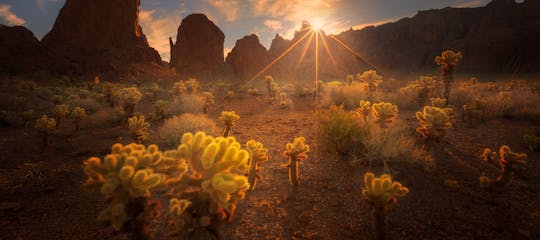
Another perfect scenario in which you might choose to use a narrow aperture in Iceland is when the sun is partially obscured. The best time for this is during summer in Iceland, when the Midnight Sun season takes hold. It doesn’t matter what the obstruction is caused by – it could be a cloud, the wall of a church or even a wildflower or a puffin. What matters is that you close your aperture to somewhere between f/16 and f/22, which will create a beautiful sunstar.
What is the Best Aperture to Use for Landscape Photography?
As you may have learned during this article, the best aperture for landscape photography in Iceland depends a whole lot on the scene that you’re shooting and the lens that you choose to use for that purpose.
The general rule is that the smaller your f-stop value, the larger or wider the aperture will be. Although this will result in less of your image being in focus, the parts that are in focus will be sharp. This is helpful for photographing the Northern Lights, as well as for getting small foreground details in focus with dreamy backgrounds, such as at many of the stunning waterfalls along Iceland’s south coast.
 The smaller the f-stop value, the larger the aperture will be. Photo by: 'Iurie Belegurschi'.
On the other hand, if you use a bigger f-stop value, then the aperture will be smaller or narrower. This will help to keep more of your scene in focus, such as when you’re photographing at the iconic Mt Kirkjufell, where the waterfalls in the foreground are at a significant distance from the mountain itself in the background.
 Using a bigger f-stop value helps to keep the entire scene in focus without having to focus stack. Photo by: 'Iurie Belegurschi'.
In a nutshell though, the best aperture to use for landscape photography in Iceland relies a lot on the sweet spot of your camera lens, which will give you a ballpark range for its sharpest aperture. This is usually between two and three stops out from the maximum aperture of your lens. Combined with the scene that you’re shooting, the sweet spot will help you to work out how to keep everything in focus whilst allowing you to harness your creativity to your full potential.
Of course, if you can’t be bothered figuring out the sweet spot, then start with the most popular aperture values used in landscape photography, which are between f/8 and f/16. You can always use trial and error to figure out your own best apertures to use for landscape photos in Iceland!
About the author: Serena Dzenis is a landscape photographer based in Iceland. You can find more of her work on her website or by following her on Facebook and Instagram.
Are you ready to test your photography skills in-field? Join one of our photography tours and workshops in Iceland!


Other interesting articles

Ultimate Guide to Black and White Photography
In just a few short years, the fantastic medium of artistic self expression we know as photography will celebrate its 200th birthday. Two hundred amazing years worth of trial and error, two centurie...Read more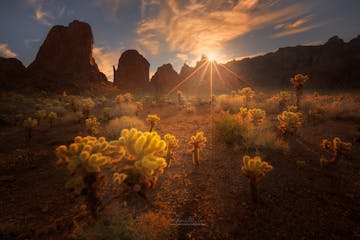
Creating Starburst Effects in Your Landscape Photography
Would you like to know the secrets of photographing sunbursts? Any keen photographer will know this magical effect as the sun peers around an object in the foreground, illuminating everything in its...Read more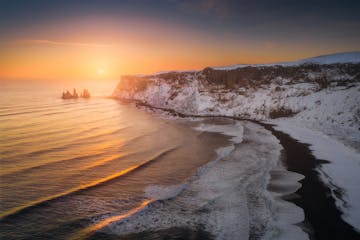
Landscape Photography Composition Techniques | The S Curve
Travelling to a place like Iceland is usually very high on the bucket lists of landscape photographers all around the world. It’s not hard to see why, as there are spectacular scenes to be captured...Read more