
HDR Photography in Iceland | Exposure Blending for Beginners


Getting the right exposure when you’re practicing landscape photography in Iceland can be difficult, particularly when you’re shooting somewhere that has a high dynamic range (HDR), such as inside an ice cave. The brightness of the light at the mouth of the cave combined with the darkness of the foreground can result in blown-out highlights and crushed shadows within the scene.
- Learn about Hard vs Soft Graduated Neutral Density Filters for Landscape Photography
- Discover the Ultimate Guide to HDR Photography
- Find out How to Use Leading Lines for Better Compositions in Landscape Photography
However, this isn’t just a problem that you’ll find creeping up on you in Iceland. As a landscape photographer, you may have already experienced a similar frustration to this when trying to capture the full dynamic range of a landscape much closer to home in a single shot.
More often than not, you have probably ended up with a well-exposed foreground and a completely white sky, or with an underexposed and almost black foreground while the sky has retained a lot of detail.
Unfortunately, it is sometimes impossible to obtain a well-balanced exposure in just a single image. Your camera’s sensor is limited in that it can only capture a scene with one aperture and one shutter speed across a single frame at a time. This means that when there is a lot of dynamic range within the scene, the single shutter speed that you choose to use may not be enough to record the entire scope of light within the landscape.
As a consequence, the final image that you end up with might look nothing like what you may have actually seen in-field. That’s because our eyes can absorb much more dynamic range than is able to be captured by a camera sensor.
Hang in there though… just because your camera has this limitation doesn’t mean that you need to give up on achieving a perfectly exposed shot. This is where the art of exposure blending your photos for increased dynamic range comes in.
What is Exposure Blending?
Exposure blending is a popular advanced landscape photography technique that involves combining bracketed shots during post-processing to create an accurate representation of the many different tones, details and light that you may have seen with your eyes while you were in-field.
One of the more creative aspects of this photography technique is that it allows you to blend a longer exposure together with an image taken at a faster shutter speed. This is how you can achieve the dreamy silken effect of a moving waterfall, such as Dettifoss below, combined with the beauty of the stationary flowers in the foreground.
 Exposure blending allows you to combine two images of different shutter speeds. Photo by: 'Iurie Belegurschi'.
If you were to take an image of these flowers with the same shutter speed as you took the waterfall, then they would probably be a little bit blurry due to movement caused by the wind.
Similarly, exposure blending is a great technique to use for photos of ice caves and the Aurora. You can recover a lot of the dynamic tonal range within the darkness of an ice cave, or even capture a beautiful foreground at night with the Northern Lights dancing overhead so as to have an anchoring point of interest in your shots.
For the purpose of this guide, we'll be focusing on very basic exposure blending for HDR images, rather than for combining images for composite photography. So without further ado, let’s explore how you can use this incredible technique to produce breathtaking HDR images from your landscape photography trip to Iceland.
How to Exposure Blend
Step 1: Bracketing Your Shots
The first step to exposure blending is to bracket your images. This simply means that you will take multiple images of the same scene with different exposure values (EV).
As each photograph will contain a different exposure of the scene, you can then blend these bracketed images together with computer software in order to recover blown-out highlights, bring back details lost to shadows, or to merge brighter foregrounds with darker backgrounds.
Bracketing your shots involves thinking and planning ahead of time, so that you’ll be able to bring home enough data within your RAW files to combine them with post-processing software later on. To make things easier, make sure to mount your camera onto a tripod when using this technique, so that the major elements within the frame will be aligned in every image. This will make blending your images later on much more straightforward.
Once you’re ready, there are two ways that you can bracket your shots. The first is to set up auto exposure bracketing on your camera, while the second is to manually bracket for each scene.
Auto Exposure Bracketing
Auto exposure bracketing is the simplest way to begin taking bracketed shots. With this setting turned on, your camera will automatically take a series of bracketed images at regular intervals of shutter speed stops.
Most cameras will allow for a series of 3-4 images at regular intervals of 1-3 stops between each automatically bracketed exposure.
To set your camera up to use auto exposure bracketing, simply look for a button with the letters ‘AEB’ (for Canon), ‘BKT’ (for Nikon), or go into your settings menu (Sony and all other cameras). You can then specify the number of exposures that your camera will take and how many stops you will leave between them at regular intervals.
Manual Bracketing
Although manually bracketing a scene to capture the full dynamic range can take a little bit more time and effort, the result is usually much more worthwhile as it will allow you to have increased control over individual exposures.
When you manually bracket in landscape photography, you can take a number of different exposures at irregular shutter speed intervals. So rather than exposing at regular stops as you would with auto bracketing (e.g. -1EV for the highlights, 0EV for the base exposure, +1EV for shadows), you can have full control of each exposure at your own intervals (e.g. -3 EV for the highlights, 0EV for the base exposure, +1 EV for the shadows).
While the number of shots that you will need to take for an exposure blend depends largely upon the level of tonal range within the scene, usually you will need just three exposures: one metered for the highlights at a faster shutter speed, another metered for the shadows at a slower shutter speed, and a base exposure with average metering for the tones between.
Step 2: Combining Your Bracketed Shots
Once you’ve taken a series of bracketed shots in-field, the next step in exposure blending will take place behind your computer screen. There are two ways to do it – with HDR software or by multiple exposure blending.
With HDR Software
The aim here is to use specialised software to process your bracketed images into a single HDR image. To do so, you will blend the best light within each bracketed image together in order to produce a final, well-exposed photograph. Though this might sound difficult now, it’s not as hard as you may think.
First of all, upload your bracketed shots onto your computer or a hard drive and import them into Adobe Lightroom. At the very least, you should have a base exposure, an overexposed image and one that is underexposed.
Next, select all of the bracketed images within the series, then go to ‘Photo’, ‘Photo Merge’, and select ‘HDR Merge’. You should then see a pop-up which shows a preview of how your image will look when it is blended.
At the top right of your screen, you will see the HDR Option panel. Make sure that the ‘Auto Align’ box is checked. This means that your software will attempt to automatically align all of the major elements within your source images, in order to ease the blending process.
It is also important to disable the ‘Auto Settings’ option within the same panel. Having this option on means that the software will attempt to process the tones across all of the images for you, which can result in terrible results and the much feared “fake HDR look” – you know the one, where the final image is oversaturated and there is an awful glow, too much contrast or even not enough.
The final option in the panel is the ‘Deghost Amount’. This is a slider that moves across from ‘none’ to ‘low’, ‘medium’ and ‘high’. Basically, this option helps to correct the portions of the scene that may have shifted while you were taking the bracketed images within your series, such as the clouds in the sky. You can mark the checkbox ‘Show Deghost Underlay’ to see how much of the final image that the deghost option will affect.
Once you’ve made these changes, click on ‘Merge’ in the top right corner of your screen. Lightroom will then perform the merge to create an HDR file – a single image that contains all of the exposure information from across your bracketed shots, from highlights to shadows and all of the tones between.
Put simply, this image will have far more detail and a higher dynamic range than each single shot had before you put them together. By blending multiple bracketed exposures to create a single HDR image, you are giving yourself much more data to work with in order to achieve your creative vision or to reflect the scene as you may have witnessed it with your own eyes.
The final part of this procedure is to open up the HDR file and to process the image much as you normally would within Lightroom or any other post-processing software. Experiment by playing around with some of the options, such as contrast and vibrancy. As you’re working on your HDR image, try not to go overboard with your processing – the last thing that you’ll want is for your beautiful landscape photos of Iceland to look like Andy Warhol’s pop art.
Multiple Exposure Blending
This is done manually by hand-blending your bracketed exposures in Photoshop to create a final HDR image. There are many different ways to do this but we'll be focusing on the 'Apply Image' technique.
This technique separates your exposure into two halves – 50% brights and 50% darks. It will generate a mask which will allow you to make specific changes without affecting tones that you want to leave intact. For example, you can make changes to the highlights without influencing any of the shadows.
The aim is to combine your bracketed exposures by using the brightest shot for foreground detail, the darkest shot for the sky, and the middle exposure as a base.
The first step is to open your bracketed images into one document in Photoshop. Do this by opening your darkest exposure first. Next, open the base exposure go to 'Layer', 'Duplicate Layer'. In the 'Destination' field, select the filename of the first image that you opened. This will duplicate the second image into a layer on top of the first image.
After that, open the brightest exposure and duplicate it as a layer on top of the other two layers.
Once you have all three layers in the same file, go to 'Edit' and 'Auto Align Layers'. This will ensure that your bracketed exposures are aligned for the purpose of blending.
The next step is to make the brightest exposure invisible by pressing the little eye icon beside the layer. You can then create a layer mask on the base exposure by going to the bottom of your layers panel and clicking on the rectangle icon with a circle in it. Select the layer mask by clicking on it. The layer mask should now appear to have white borders around it, indicating that it has been selected.
To blend the darkest exposure with the base exposure, simply go to the 'Image' menu and down to 'Apply Image'. A pop-up box will appear. In the 'Layer' option, make sure that you have selected 'Merged'. The 'Channel' option should be set to 'RGB' and 'Blending' mode should be set to 'Multiply'. Check the box for 'Invert' and press 'OK'.
This process will apply the mask onto the layer. The result will be that it brightens up some of the darker parts of your base image. You can click the little eye icon next to the layer to see what changes have been made.
Next, click the eye icon on the brightest exposure to make it visible again. Repeat the 'Apply Image' process with this exposure to brighten up the foreground even more. In some cases, the foreground may appear to be too bright. To make it look more realistic, simply reduce the opacity of the layer until it seems a bit more natural.
The result should be a blended HDR image of multiple exposures with a balance of light throughout the tones.
Keep in mind that what we've explained above is just a beginner's guide to exposure blending for higher dynamic range. Once you become comfortable with the 'Apply Image' technique, you'll be able to move onto the more advanced process of hand-blending exposures by using luminosity masking with Photoshop, which makes it possible to perform more specific alterations to the tones of the image.
When to Exposure Blend Landscape Photos of Iceland
As we’ve already mentioned, exposure blending is a powerful photography technique that has a myriad of different uses for your landscape photography of Iceland. You can apply it to create a well-balanced exposure within an ice cave, or even go all out and take multiple exposures of a scene across an extended period of time.
For example, it may be impossible to capture a properly exposed foreground in the darkness of night with the Northern Lights overhead. However, the exposure blending technique will allow you to bring back some of the tones and detail in the shadows, by combining a longer exposure for the foreground with a shorter exposure for the Northern Lights in the sky.
 Northern Lights in Iceland. Photo by: 'Iurie Belegurschi'.
After processing, the resulting final image will be a blend of two exposures that will hopefully reflect your intentions for the scene, despite being unable to capture it in a single shot in-field.
You can also use this technique when shooting into the sun, which can often leave dark shadows in the foreground. By taking bracketed exposures and blending them with software later on, you'll be be able to create an image that is able to much more accurately reflect how our human eyes may have perceived the scene.
 Exposure blending is a must when there is a lot of dynamic range in the scene. Photo by: 'Iurie Belegurschi'.
Once you've got a handle on exposure blending for HDR images, you can progress to more advanced techniques for creating composite shots. These are particularly useful on days with bad weather, when the sky is cloudy and seemingly unexciting, or when conditions are very windy. By blending together a longer exposure for the clouds with a shorter exposure to freeze-frame otherwise swaying grass in the foreground, you’ll end up with a much more interesting composition.
Although composite images and exposure blending may sometimes be a contentious topic amongst landscape photographers, it is important to remember that landscape photography is an art and that in art, there are no wrong answers – there are simply a range of different techniques that you can use and master as an artist to help you achieve your creative vision.
Last but not least, even though exposure blending can be a tricky technique to learn, it is one that can be very rewarding in landscape photography, particularly when you are able to finally capture the entire dynamic range of a scene to accurately reflect what you witnessed at that point in time. It can even evoke memories of how you felt and what it was like to be there, which is a very special and personal thing to be able to achieve.
About the author: Serena Dzenis is a landscape photographer based in Iceland. You can find more of her work on her website or by following her on Facebook and Instagram.
Hone your newfound photography techniques and skills in the incredible landscapes of Iceland. Join one of our Photography Workshops and Tours today.


Other interesting articles

10 Tips for Stunning Portrait Photography
They say that the eyes are like windows to the soul. That’s one of the reasons why portrait photography can be so fascinating. The best portraits in the world convey much more than just a simple gla...Read more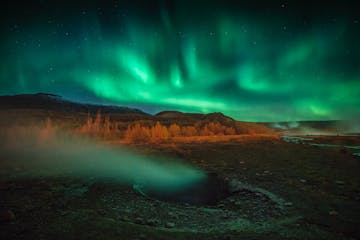
Understanding Image Noise in Your Landscape Photography of Iceland
When you’re photographing the landscape in Iceland, chances are that at some point, you’ll come across the problem of image noise. Digital camera noise is a technical issue that can annoy anyone, fr...Read more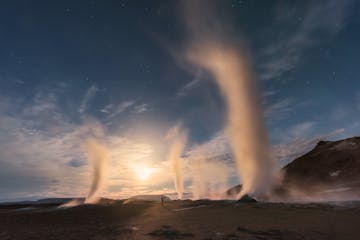
When to Use High ISO for Landscape Photography in Iceland
You may have heard other photographers suggesting that you use the lowest ISO setting possible for landscape photography. Although the lowest ISO setting will work in most situations, there are some...Read more


