
How and Why You Should Shoot Vertical Landscape Photos

- When to Shoot Vertical Landscapes
- With a Vertical Subject
- If the Subject is Taller than Wide
- When the Subject is Looking Up or Down
- To Focus Attention
- For Commercial Purposes
- Tips for Shooting Vertical Landscape Photos
- Tip #1 - Get Close to the Foreground
- Tip #2 - Divide the Frame into Zones
- Tip #3 - Use an L-Bracket
- Things to Consider When Shooting Vertical Landscape Photos
- Why Shoot in Vertical Mode When You Can Just Crop?

It's known as the great horizontal and vertical picture debate. For landscape and nature photography, should you be shooting horizontally or vertically?
- Check out these Landscape Photography Workshops
- See these 8 Tips to Improve Your Landscape Photographs
- Find a wide range of Photography Tutorials to improve your photography
There’s no question that the majority of landscape photos in the world are photographed in the horizontal or ‘landscape’ orientation. In fact, horizontal compositions are pretty much the norm when it comes to any kind of landscape photography.
One theory that seeks to explains this is that when we look at a landscape with our own eyes, we perceive it as being on the horizontal axis and so it makes sense that we would shoot it with a horizontal orientation.
However, not all landscapes are suited to the horizontal view. In fact, some landscapes look their best when you turn your camera onto the vertical axis, creating a much more compelling scene that attracts the viewer’s eye. Shooting a landscape in vertical format or ‘portrait’ orientation can also help you to exercise your eye for composition. So when exactly is it best to shoot vertical and how will you learn to master compositions in this orientation?
When to Shoot Vertical Landscapes
With a Vertical Subject
Vertical landscape photos work best when the subject of your photograph is also vertical. Consider a very tall waterfall or a mountain. These types of scenes work very well when shot in vertical format, due to their height. By shooting in vertical format, you can accentuate the drama and dynamic qualities of these subjects. As you can see in the image below, shooting the image vertically makes the sheer cliffs seem even more steep, highlighting the leading lines from the cliffs and the waterfall into the peak of the mountain itself.
 Leading lines are accentuated with the distortion of a wide angle lens to create a more dynamic image when shot vertically. Photo by: 'Kaspars Dzenis'.
If the Subject is Taller than Wide
Another situation in which you might shoot vertical as opposed to horizontal for landscape photos is when your subject is taller than it is wide.
 Vertical images can amplify the sense of motion. Photo by: 'Kaspars Dzenis'.
Take this example of the Northern Lights in Iceland, shooting up from a position in the sky over the thundering Goðafoss waterfall. The vertical orientation compliments the two subjects here, which are the Aurora Borealis and the waterfall itself. In the foreground, there are some rocks acting as a leading line into the waterfall and the Northern Lights. By photographing this scene vertically, the Aurora is given space within the frame to continue moving, which is why it appears to be dancing through the sky.
This technique contributes to amplifying the sense of motion in the image, along with the downward motion of the waterfall cascading into the smooth and dreamy water below. The rocks serve as an anchor for the two different ranges of motion, which increases the impact of the scene.
When the Subject is Looking Up or Down
Shooting vertically is also perfect for landscape photography when your subject is either looking up or down. It allows you to utilise the subject’s gaze to highlight other leading lines, giving the sense that the subject might be moving deeper into an image or towards the camera.
 Vertical orientation can create a sense of depth. Photo by: 'Iurie Belegurschi'.
In this photo of an ice cave in Iceland, the vertical orientation serves to highlight the height of the ice cave itself, exaggerating the snow in the foreground and thereby creating a sense of depth, giving scale to the rest of the image.
To Focus Attention
Shooting landscapes vertically can also be used to focus a viewer’s attention on a single subject, such as this depression within the ground of a geothermal area in Iceland.
 Shooting vertical landscapes can focus attention and create a more dynamic scene. Photo by: 'Kaspars Dzenis'.
The effect is achieved by removing the viewer’s peripheral vision within the scene. This helps to cut out distractions, such as other geothermal depressions within the immediate vicinity that might otherwise catch the viewer’s eye. Rather than allowing them to see everything, you are focusing their attention on the subject of your photo instead, making for a much more interesting and compelling frame!
This image also demonstrates how a vertical composition can be more dynamic than its horizontal counterpart, as it allows you to be more creative with the scene by exaggerating the depression itself, making it seem bigger than life, adding depth and making the landscape seem vast with an illusory vanishing point somewhere near the mountain in the distance.
For Commercial Purposes
Vertical landscapes are also quite useful for commercial purposes and for social media platforms such as Instagram and Facebook, which employ a vertical scrolling style. Magazines will often look for vertically composed shots, so if you shoot in the vertical orientation, then your landscape photos will be easier to sell on the stock photography market.
Basically, if you really think about it, most book covers, magazines, posters and even our smartphones rely on the vertical orientation, so it only makes sense that vertical landscape photos will often be in demand!
Tips for Shooting Vertical Landscape Photos
So now that you know when it’s best to shoot vertically, let’s look at how you can actually employ this method to start creating amazing landscape photos in the vertical format.
Tip #1 - Get Close to the Foreground
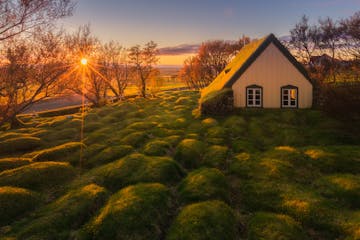
Vertical compositions with a wide angle lens and something interesting in the foreground can provide a dramatic way of leading the viewer’s eye into a greater scene. For example, these yellow dandelions are the perfect way of drawing the eye into the little turf house, with the subtle light of the sun helping to create a leading line.
By getting close to your subject in the foreground whilst in vertical orientation, you can change the perspective to make certain elements of the landscape stand out. As such, you can actually include more of the foreground in your shot, drawing the viewer’s eye deeper into the image toward the main subject.
 Use a wide angle lens to exaggerate the foreground in a vertical image. Photo by: 'Kaspars Dzenis'.
To make a real statement and to really enhance the foreground, use a wide-angle lens and get low and close to your foreground elements. You can also do the opposite and move your camera high but close to the foreground, to highlight the elements in a sweeping scene, such as in this photo with the waves of the shoreline curling around a rock at the Reynisfjara black sand beach in Iceland. As opposed to getting down low, this shot involves elevating the camera above the rock but still being close enough to create an exaggerated feeling of depth, with a leading line towards the Reynisdrangar sea stacks in the background.
Tip #2 - Divide the Frame into Zones
An easy way to start shooting vertically is to divide your frame into zones. Ensure that your vertical composition has a clear foreground, middle-ground and background, with a clear subject of interest within each of the three zones. This will help you to create a well-balanced image with good visual flow.
 Divide your frame into zones when shooting vertically. Photo by: 'Kaspars Dzenis'.
Take this image of the Northern Lights over Brúarfoss waterfall in Iceland. As you can see, the Northern Lights appear to be shooting out from behind the mountain within the first third of the image, drawing our eyes into the waterfall within the middle-ground. From there, our eyes are led downwards towards the milky flow of the water below. Given that each of the zones in this frame appears to be connected, it helps the viewer’s eye to move from one part of the image to the next, thereby improving upon their visual experience.
Tip #3 - Use an L-Bracket
While it isn’t necessary to invest in an L-bracket for vertical landscape photography, particularly if you already own a great tripod that will allow you to quickly change orientations whilst still remaining level, an L-bracket can help to make vertical landscape photography easier.
Combined with an Arca-Swiss compatible ball-head, an L-bracket will allow you to switch quickly from landscape to portrait mode, without compromising the fact that you may have already levelled your shot. If you do switch from horizontal to vertical by using an L-bracket though, you may need to consider recomposing, given that the composition will change once you have switched between the orientations.
Most people find that using an L-bracket makes them more inclined to try vertical landscape photography, as the process becomes much easier and quicker to initiate. Of course, it’s difficult to make a decision without having first tried it for yourself. So if you have a friend who uses an L-bracket, ask them next time if you can borrow it for a few minutes. You may find yourself falling in love with it and never looking back!
Things to Consider When Shooting Vertical Landscape Photos
Now that you know when it's best to shoot in vertical format for your nature and landscape photography, as well as our top tips on how to do it, here are some final things you should consider when shooting vertically.
-
Are you getting the most out of the scene when shooting it vertically as opposed to horizontally?
-
Is the foreground offering anything to the composition when you are shooting in vertical format? Are there leading lines to draw the eye around the frame from the foreground to the background?
-
Have you got a strong composition that makes the most of the vertical format?
-
Does the vertical perspective add to the dynamic impact of your image?
By considering the points above before you shoot, you'll be able to decide exactly when it will be best to photograph the scene in vertical format. If in doubt, you can always take two different shots – one in vertical and one in horizontal – so that you can see the different perspectives and decide later on which image has the stronger visual impact.
Why Shoot in Vertical Mode When You Can Just Crop?
While it remains entirely possible for you to crop one of your horizontal landscape or nature photos to make it vertically orientated, it is best to always begin the shot vertically, rather than to do it in post-processing. The reason for this is that when you crop an image, it will reduce the image size, which will in turn result in loss of quality issues.
Furthermore, whenever you take a horizontal photo, you are composing for that particular shot. Cropping it into a vertical shot thereafter means that you are no longer able to optimise the composition for a vertical orientation. To get around this, try to employ both methods when you’re out and about shooting. By all means, shoot your landscape photos horizontally but when you’ve finished, try the same scene again with a vertical orientation. You might end up creating a much more compelling composition than you could have imagined before, simply by applying a small change of perspective.
Do you prefer shooting in horizontal or vertical orientation for your landscape photography? What were some of the difficulties you first encountered when you tried to switch? Leave a comment below!


Other interesting articles

5 Advanced Landscape Photography Techniques to Try in Iceland
So you’ve been reading a lot about landscape photography tips and you’ve picked up a thing or two, but they just seem a little basic. Often, these tips are aimed at photographers who are just starti...Read more
Ultimate Guide to Achieving Beautiful Bokeh
Photographers love to capture images with soft, out-of-focus backgrounds and a sharp subject. This effect can attract a viewer's attention to the most important elements within your composition. How...Read more
Landscape Photography Composition Techniques | The S Curve
Travelling to a place like Iceland is usually very high on the bucket lists of landscape photographers all around the world. It’s not hard to see why, as there are spectacular scenes to be captured...Read more


