
Landscape Photography Settings | How to Set the Focus


Focusing your lens is one of the most important topics in landscape photography and invariably one that comes up a lot during our photography tours and workshops in Iceland. If you don’t set the focus properly before you take a picture, then you risk running by the very real scenario that your photos won’t be sharp or even usable once you get home.
- Learn How to Get Creative with a Fisheye Lens
- Check out this article on Understanding Lens Flare in Landscape Photography
- Discover the Ultimate Guide to Understanding Focus in Photography
It’s true – the conditions here can fluctuate quite significantly, making it a challenge to capture the perfect shot. There is no need though to go into panic mode though, by placing your camera into autofocus and snapping away.
Learning how to properly set your focus will put you one step further on the path to harnessing your camera to its full potential, in order to utilise it to express your creativity to its fullest and to capture amazing photos of Iceland. So without further ado, let’s look at how you can easily set the focus when photographing the landscape in Iceland, to ensure that you’ll be taking home crisp and clear shots worthy of hanging on anyone’s wall!
Step #1: Choosing a Focal Point
 Choosing a focal point is as easy as placing it on your subject in Iceland. Photo by: 'Iurie Belegurschi'.
With portrait photography, choosing a focal point is as easy as placing the focus onto your subject’s eye. A similar technique may be employed for wildlife photography, though if your subject is moving quickly, then you can always focus somewhere on their body instead.
In fact, with any type of photography, the focus point should be on the subject. So what happens when you’re in Iceland and you want to capture the vast beauty of the landscape without a single person or an animal in sight?
 Make sure to focus on your subject matter in the foreground. Photo by: 'Iceland Photo Tours'.
As with any other genre of photography, landscape photography involves focusing on your subject matter. In most cases, this will be something of interest in the foreground, such as cracks in the ground, lupines and wildflowers, or something like a patterns in the sand at the base of Hvítserkur rock stack.
The trick is to have strong foreground elements, which will lead your viewer’s eye around the frame and provide a strongly rooted point of interest.
 Your focus point should be about a third of the way from the bottom of your picture. Photo by: 'Iurie Belegurschi'.
If you’re shooting with a wide angle lens, then your focus point should sit approximately ⅓ of the way from the bottom of your picture.
On the other hand, if you’re shooting with a telephoto lens, then your focus point should be something that is closest to you or the most important element within your frame.
Whatever lens you decide to use, you’ll need to choose the best spot at which to place your focal point, in order to help draw your viewer’s eye into the scene for a well-composed shot.
 Follow the rule of thirds to choose your focal point easily. Photo by: 'Iurie Belegurschi'.
Following the Rule of Thirds will allow you to choose your focal point easily. It is also one of the most valuable things you’ll ever learn about composition in landscape photography.
However, if you need a little assistance to figure out where the thirds sit within your frame, then have a look through your camera settings. There is likely an option for you to select which will overlay a grid onto your viewfinder or the LCD. This will show you exactly where the thirds actually sit within your frame.
Turning this option on will mean that you will always know where the lower third of the frame is, thereby completely eliminating the need for guesswork.
Step #2: Adjust Your Camera Settings
Now that you’ve picked a focal point, don’t just set your focus at infinity. When you are using a wide angle lens and there are foreground elements near you, focusing on infinity may actually make them blurry and cause them to become distracting.
To ensure sharp and crisp shots, make sure that your camera is attached to a tripod and that the lens is switched to Manual Focus. Then, turn on the option for Live View.
For those who have never used Live View before, it may seem like a daunting option. However, the process is actually quite simple, much like the rest of this guide! Once you’ve tried it, you’ll find that it’s a lot easier to focus with Live View than it is to peer through the tiny viewfinder.
In fact, Live View is actually more accurate for landscape photography than looking through the viewfinder alone, as it allows your eye to see much more of the overall picture. Plus, it is absolutely essential to turn on Live View when you are manually focusing, in order to be able to see the parts that are clearly in focus as well as those which are not.
To focus in Live View, use the buttons on the back of your camera to increase the magnification to 100% over your focal point. This will enlarge the area so that you can see it clearly.
Then, slowly rotate the manual focus ring of your lens until your focus point appears as sharp as possible.
Don’t worry if other parts of the shot appear to be out of focus. We’ll talk about how to fix that within the next few steps. For now, all you need to do is to make sure that your focal point is sharp. It may take a bit of trial and error by twisting the manual focus ring until you get your focal point in focus. Don’t fret – just keep at it until it appears to be as sharp as possible.
Step #3: Managing Depth of Field
 Maximise your depth of field for sharp focus. Photo by: 'Iurie Belegurschi'.
Once you’ve selected a focal point and gotten it focused sharply, there are a couple of other things that you’ll need to consider to ensure that the landscape you have photographed is all in focus. If parts of the frame still appear to be out of focus, then the first thing you’ll need to do is to maximise your depth of field.
Of course, you can always shoot at f/22 for the largest depth of field. However, there is not a single lens in the world that performs at its best when shooting at this aperture. The reason for this is diffraction – the loss of sharpness, particularly at the edges of the frame, as you close the aperture. So although you may initially think it will make your image sharper if you shoot with the largest depth of field that your lens can manage, the truth is that it actually won’t.
Rather than shooting with a smaller aperture, try this little trick to determine the ‘sweet spot’ of your lens. The sweet spot refers to the aperture at which your lens is able to produce its sharpest images. By keeping your aperture as close to the sweet spot as possible, you’ll be able to easily ensure that you take sharply focused photos of the landscape during your time in Iceland.
Although the sweet spot can vary between lenses, it generally lies between two and three stops out from the maximum aperture of your lens. Otherwise, if you can’t be bothered figuring out the sweet spot, we suggest that you start with the most popular aperture values used in landscape photography – somewhere between f/8 and f/16.
Step #4: Try Focus Stacking
 Sometimes you will need to focus stack, such as when shooting in ice caves. Photo by: 'Iurie Belegurschi'.
There are times when, no matter how well you’ve picked a focal point and manually focused upon it with an appropriate depth of field, it still won’t appear sharp from the foreground through to the back. To combat this, you can try a little photography technique that we call ‘focus stacking’.
 Focus stacking will help you to get the foreground and background in focus. Photo by: 'Iurie Belegurschi'.
Focus stacking involves taking several pictures of the same subject, each with a different focal point with an aperture that is set according to the sweet spot of your lens. For example, in this photo of the famous Mt Kirkjufell on Iceland’s Snæfellsnes Peninsula, you might focus once for the shards of ice in the first third of the photo, a second time for the shards in the middle ground, and a third time on the mountain itself.
After you’ve taken several pictures using this method, you can blend the images together using post-processing software such as Adobe Photoshop or Luminar, to create a single image that is sharp, all the way from the foreground to the background.
Although this technique involves a little bit more work in-field and later on during post-processing, it should result in extremely sharp photos. The reason for this is that you will ultimately be combining several sharp focal points to make a single sharp overall image. Doing so avoids the problem of diffraction and enhances the aesthetic of your shot, making for truly incredible landscape photography that will easily reflect the magnificence of the beauty that is Iceland.
About the author: Serena Dzenis is a landscape photographer based in Iceland. You can find more of her work on her website or by following her on Facebook and Instagram.
Have you got any other tips to help others focus when they’re photographing the landscape in Iceland? Share your thoughts in the comments below!


Other interesting articles
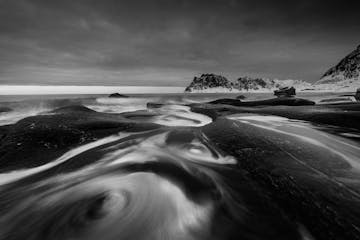

15 Tips for Monochrome Photography
Monochrome photography has always had a major role in the photographic history; many people think it has only been a trend within the last few decades but the truth is that it’s been a common practi...Read more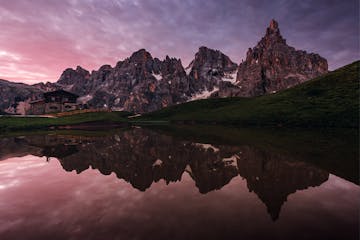
How to Use Balance for Better Compositions in Photography
Knowing how to properly compose your pictures is what will make them stand out from the crowd. While photographic technique is also important, if you don’t manage to find a great composition, then y...Read more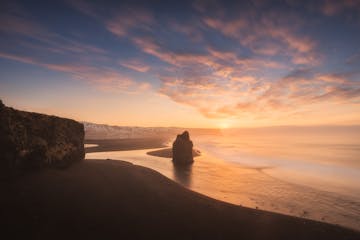
HDR Photography in Iceland | Exposure Blending for Beginners
Getting the right exposure when you’re practicing landscape photography in Iceland can be difficult, particularly when you’re shooting somewhere that has a high dynamic range (HDR), such as inside a...Read more


