
Understanding Image Noise in Your Landscape Photography of Iceland


When you’re photographing the landscape in Iceland, chances are that at some point, you’ll come across the problem of image noise. Digital camera noise is a technical issue that can annoy anyone, from hobbyist photographers to professionals alike. Whether you have a stunning composition of an ice cave or the spectacular Northern Lights, a spattering of image noise is bound to detract from the overall aesthetic of your photos and can effectively kill their success.
- Learn about How to Minimise and Clean Camera Sensor Dust
- Discover the The Essential Guide to Photographing the Icelandic Horse
- Check out the Ultimate Guide to Sunrise Photography
Another headache with noise is that it often renders your photos unsuitable for printing, particularly at a larger scale. However, by understanding what image noise actually is and how it is caused, you’ll be able to minimise its impact while you are out shooting in Iceland, as well as during the post-processing phase when you return home, to ensure beautiful photos that you’ll be able to look back upon for years to come.
How Does Noise Affect Your Photos?
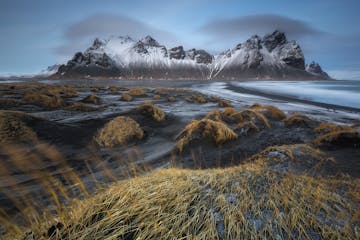
 It's impossible to control the light in the landscape of Iceland. Photo by: 'Iurie Belegurschi'.
There’s no doubt about it that the landscape in Iceland is dramatic. As a landscape photographer, your job is to capture it in the best conditions that will allow you to tell your story or to document your adventure. What you photograph is up to you – the conditions are varied in Iceland and the weather can be diverse but ultimately, when you decide to shoot and the emotional range or other effects that you choose to capture are up to you.
However, unless you have brought your own studio rig with you, the one thing that you cannot control for when you are shooting the landscape in Iceland is the light. There will be times when you will shoot in incredibly low-light and there just won’t be any way to escape it unless you decide not to shoot at all… but who wouldn’t want to capture the Northern Lights when they make their very elusive but elegant display in the starry sky at night?
 Noise can appear when you're shooting in very low light, such as at night when the Aurora is in the sky. Photo by: 'Edwin Martinez'.
How about when you’re deep inside an ice cave and the only available light trickles in from just a tiny entrance?
 Light is difficult to manage when you're in an ice cave. Photo by: 'Iurie Belegurschi'.
These are the moments when you might want to push the shadows a bit or to increase your overall exposure in order to enhance the details within the darker areas of your image. However, the downside is that these are also the major times when you end up giving noise the green light to enter your images.
Noise can appear in varying degrees of intensity. It often takes the appearance of an uneven speckled and grainy look in your photos. Although it can be creative and somewhat attractive with film, noise is not as revered in the world of digital photography. The reason for this is that it can make your images appear unattractive, particularly when displayed on a computer screen. Your photos may appear soft and even contain strange artefacts that obscure the details and ruin their overall appeal. You can imagine then how they might be a complete disaster to print.
When you shoot in a low-light environment, there is not enough light to land on your camera’s sensor for a well-exposed image. Raising the ISO will increase your camera’s sensitivity to the light by amplifying the light signals and making them brighter, though the initial dilemma remains – that there are not enough signals to begin with to land on every part of your camera’s sensor. As a result, wherever the light doesn’t hit your sensor or where only a smidgen of light does, you will see noise, chromatic aberrations and other awful artefacts.
 You may end up with noise if you shoot at longer exposures. Photo by: 'Iurie Belegurschi'.
Other times that you increase the risk of noise in your images of Iceland is when you shoot longer exposures or in higher ambient temperatures. Whenever you are in a low-light environment, you will want to keep the shutter open for longer on your camera, thereby increasing the exposure time. When you do so, the sensor becomes heated, which when compounded with ambient temperatures, can contribute to noise as the pixels fail to render the correct colours. The level of noise and how it manifests will depend largely upon the quality of your camera’s sensor.
As such, the type of camera gear that you use can have a large effect on how much noise you will see in your photos of Iceland. Some cameras handle noise better than others, depending on the size and quality of the sensor. Cameras with smaller sensors and a large number of megapixels generally produce noisier images. Unfortunately, you probably won’t even notice the noise until you are back at home and looking at your images at full size on a computer screen. So how can control and reduce image noise in your landscape photography of Iceland?
Use a Low ISO Setting
 Use the lowest ISO setting possible for the conditions. Photo by: 'Iurie Belegurschi'.
If at all possible while you are out shooting in Iceland, the easiest and most effective way of reducing noise in your photos is to lower your ISO. When shooting in the daytime, it is best to set your ISO at 100, though if you’ll be shooting in low-light situations such as in ice caves or when photographing the Aurora, you’ll need to set your ISO a bit higher.
In this case, the best ISO will depend largely upon the aperture that you decide to use. To avoid a high ISO, you’ll want to open your aperture as wide as it can go. This will let in more light, which reduces the need for you to amplify the light. In turn, this minimises noise.
To stabilise your camera while you are doing this, make sure it is mounted to a tripod. If the resulting image isn’t well-exposed, then you may still need to push your ISO up higher. Take a few test shots so that you can compare them later on, to see at what point the ISO settings on your camera will result in more noise and lower image quality. Once you get to know the limits of your camera, you’ll then be able to work within those constraints to minimise the noise within your photos.
Shoot in RAW
To make the most of your images during the post-processing phase, you should always shoot in RAW. The reason is that JPEG images have already had their pixels compressed by in-camera processing, meaning that they will already have some noise and the quality will have been reduced. However, by shooting in RAW, your camera will record as many details as possible, meaning that you will have more flexibility to work with the recorded data and to remove any noise should this be necessary.
Watch the Histogram
You may find it daunting at first, but when shooting in low-light, you should keep an eye on the histogram. If you’ve never been able to figure out the histogram before, then take our crash course with the basics of histogram here.
In essence, the histogram is a visual representation of the brightness values of all of the pixels in your image. The horizontal axis represents the number of tones and their level of brightness, whereas the vertical axis represents the number of pixels at each level of brightness. The highest peaks of the histogram will tell you exactly where the most amount of information sits on the brightness scale within your image. If the peaks are stacked towards the left, then your image is very dark. If the peaks are towards the right, then your image is very bright. If the peaks touch either side on the left or the right, then ‘clipping’ has occurred, which means that your image is either too bright or too dark. In the latter scenario, an image that is too dark means that when you try to bring up the shadows later on during post-processing, it will most probably result in a lot of noise.
So to ensure that your images are exposed well enough for you to work with them later on during post-processing, make sure that there is no clipping according to your histogram.
In-Camera Noise Reduction
The in-camera noise reduction function is a bit of a contentious issue. Some people tell you to always have it off. Others swear by its efficacy and will tell you to leave it on. Most DSLR cameras have the option these days, so whether you choose to turn it on or to keep it switched off is up to you.
The function is designed to help you reduce noise at higher ISO settings and with longer exposures. However, it is an in-camera processing step that can sometimes take an incredibly long time to complete. For example, if you take a 5-minute exposure of the sky, then the in-camera noise reduction will take 5 minutes to complete. This can be annoying and largely impractical when you are out shooting landscape photography in Iceland. If you have the time to waste, then by all means, try it out! However, if the Northern Lights are gracing the night sky with a beautiful slow dance, then chances are that you won’t want to be standing around for too long doing nothing.
Removing Noise in Post-Processing
If you’ve taken all the steps to mitigate noise while out and about photographing the landscape in Iceland, then removing noise in post-processing when you get home will be a lot easier to do. Most software designed for post-processing, such as Adobe Lightroom or Photoshop, will allow you to remove noise. Simply open up the image and magnify it to 100% to ensure that you can see the noise, then apply some noise reduction using the luminance and colour sliders. There are no standard settings that will work for every image, so make sure that you play around until you get the noise down to a level that works for you.
About the author: Serena Dzenis is a landscape photographer based in Iceland. You can find more of her work on her website or by following her on Facebook and Instagram.
Are you falling in love with Iceland? Have you been daydreaming of travelling to Iceland for photography? Check out the top reasons why everyone wants to go to Iceland!


Other interesting articles

How to Take Sharp Landscape Photos in Windy Conditions
Iceland is a very windy country. If you’ve decided to visit, then you’ll probably already know that the wind here can be detrimental to your travels. No one ever knows how strong it will be or how h...Read more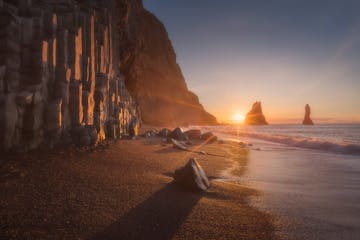
A Beginner's Guide to RAW vs JPEG in Landscape Photography
One of the most popular questions that we are often asked during our landscape photography tours in Iceland is whether it’s best to be shooting RAW versus JPEG. The answer though isn’t really all th...Read more
How to Use the Graduated Filter Tool for Landscape Photography
Of all the editing tools at our disposal, across a wide range of software for post-processing, there’s likely not one that has bailed many a landscape photographer out of a jam than the graduated fi...Read more


