
What is Aperture? An Introduction to Aperture in Photography

- F-Stop Numbers
- How Does Aperture Translate Into Your Photos?
- Depth of Field
- Sharpness
- Aperture for Landscape Photography
- Photographing in the Dark
- Photographing the Milky Way
- Getting Creative with Foreground Blur
- Creating Sunstars
- Aperture in Portraits
- Blurry Backgrounds!
- Don’t Over Use It!
- Aperture Priority
- Real World Examples for Inspiration
- The Star Tree
- Mi Fuego
- Peeking Through
- The Lonely Tulip
- Summary

When you’re just starting out with photography it’s important to know how your camera works. Aperture is an important part of the exposure triangle (shutter speed, ISO and aperture). It partly determines the exposure (how light your photo is going to be) of your photograph.
- Here are our 10 Tips for Stunning Portrait Photography
- Discover these 11 Tips to Help You Capture Stunning Landscape Photographs
- Join us on a Culture & Landscape Photography Tour in China's Fujian Province
When a camera takes a photo, the shutter mechanism opens, light comes on to the sensor after which the shutter closes again. When the lens hits the sensor and you have a lens attached to your camera, the light goes through the lens first.
Aperture blades determine how much light comes through your lens. So simply put: The aperture controls the amount of light that comes through your lens.
Obviously, when you have a big opening on your lens, lots of light can go through at once and if you have a very small opening it’s the opposite. This is what we call a ‘big or large’ and ‘small’ aperture. Remember this: a BIG aperture lets in a BIG amount of light, a SMALL aperture lets in a SMALL amount of light. So how does this translate into our camera settings?
F-Stop Numbers
On a lot of modern lenses, the whole aperture scale is not even displayed anymore. Being fully electronic, you set the aperture right inside the camera. But a lot of lenses still display their numbers on the lens, especially cinema lenses.
The aperture of your lens is displayed in f-numbers, the so called f-stop. You’ve probably seen it around when controlling your camera. F-stop numbers often range from numbers like f/2.8 (or lower) to f/22 (or higher). The lower the f-stop, the bigger the amount of light your lens lets in.
We call the lowest possible aperture setting of your lens ‘wide open’ and we call high f-stop numbers ‘closing down your lens’.

Also, when lenses are able to use very big apertures like f/1.4 or f/1.2, we call them ‘fast lenses’.
Big zoom lenses are often ‘slow lenses’. They’re able to use big apertures simply because that would make them even bigger, needing much more glass and also very expensive. That’s why, for example, a 400mm f/2.8 or 600mm f/4 lens is very big, heavy and expensive.
So why is it called a stop? Simply put: it’s an aperture setting that limits the light coming into the lens. It limits the brightness of an image by restricting the input pupil size. Basically, it stops the light.
How Does Aperture Translate Into Your Photos?
So now that we know that aperture influences the amount of light that you’re capturing with your camera, how does it actually translate visually in your photographs?
Aperture affects depth of field and partially: sharpness. When we use an open aperture (which lets in a lot of light) the effect is a more shallow depth of field. At a closed down aperture the depth of field is much bigger.
Do not mistake this with getting a ‘sharper’ photo. The definition of sharpness is something different. More on that soon.
Depth of Field
So when we want to use a very shallow depth of field, we need to open up our aperture and use a low number, for example f/2.8.
In portraits, you often see beautiful blurry backgrounds. These are achieved with large apertures to create a shallow depth of field. That’s why good portrait lenses are often prime lenses (they cannot zoom) with a big aperture.
If you buy a ‘standard’ camera with a kit lens, these lenses don’t have big apertures. They have a standard zoom range with smaller apertures, to keep the lens small, cheap and not too heavy with glass.
With these lenses, you can’t get a very shallow depth of field, simply because you can’t use big apertures. In landscapes, it's often important to get both foreground and background in focus so we tend to use smaller apertures of around f/8 to f/14.
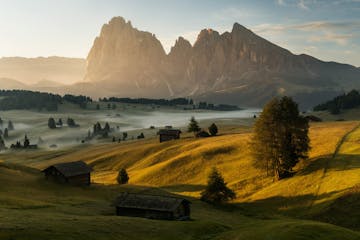
 When we’re using a wide angle with foreground elements, we tend to use smaller apertures from around f/8 to f/14. This image was taken at 16mm, f/11, 1/60s, ISO 100 from a tripod. Photo by: 'Albert Dros'.
Sharpness
Aperture also affects sharpness, but in a different way. Lenses perform best at their ‘sweet spot’. With performance, we mean where the lens is at its sharpest. Sharpest meaning where all the lines and parts with contrast are the sharpest, not the focus plane of the photo!
The sweet spot of a lens is different for every lens. There are so called ‘MTF-charts’ available online where you can check at what apertures a lens performs at its best. In general, these are around f/8.
A lens performs quite bad very closed down at an aperture of f/22. We get a lot of diffraction on closed down apertures. Also, keep in mind that wide open a lens also can get a little bit soft.
Aperture for Landscape Photography
As mentioned above, for landscape photography and when using wide angle lenses, we often use an aperture of around f/8 to f/14, simply because we have a big focus plane and a good performing lens around that aperture. But that doesn’t mean you should always go for these apertures.
Landscape photographers often use different apertures in creative ways.
 16mm, f/14, 1/3s, ISO100, Tripod. Photo by: 'Albert Dros'.
Photographing in the Dark
When we’re photographing in the evening or night and it’s dark, using a smaller aperture often results in a very long shutter speed to get a properly exposed image. Now, if we’re shooting images from a tripod, this is not that big of a problem, unless we are getting extremely long shutter speeds of let’s say 5 to 10 minutes.
In the dark, we prefer to use a bit of a faster aperture. Of course, especially when we’re shooting hand held or doing street photography, a fast aperture with a higher ISO (another article for this) are necessary to get a properly exposed image without unsharp movement.
 This shot was shot at 75mm, f/2, 1/160s, ISO1000. Photo by: 'Albert Dros'.
Using an open aperture for low light photography with moving subjects will help to keep your shutter speed fast enough in order to get the correct exposure.
Photographing the Milky Way
When we’re shooting at night and want to photograph the Milky Way, we also need to use an open aperture.
For astrophotography, we'll often use wide angle lenses with an aperture of f/2.8. However, we can’t use a shutter speed that is too long, due to the fact that it will make the stars trail in relation to the rotation of the Earth.
Using an aperture of f/2.8 with a higher ISO is necessary to capture landscapes with the Milky Way.
 Wide angle lenses with faster apertures help to avoid star trailing. Photo by: 'Albert Dros'.
Using a wide angle lens with a fast aperture for Milky Way shots helps to avoid star trailing.
 Opening up the aperture helps to shoot the Aurora. Photo by: 'Albert Dros'.
It's the same thing when photographing the aurora. Open up your lens to let in as much light as possible, preferably f/2.8 or faster.
Getting Creative with Foreground Blur
A wide open aperture creates a beautiful, blurry, out of focus area in your picture. You can use this in the foreground for example, when getting very close to a subject, such as grass. By using an open aperture, you can get a blurry out of focus foreground, leading you into the background.
For this purpose, we use an open (big) aperture to create a more blurry foreground.
 By getting close to a foreground like flowers or grass and using a wide aperture you can create dreamy foregrounds. Photo by: 'Albert Dros'.
Creating Sunstars
Another creative way landscape photographers often use apertures are so-called sunstars. When the sun is touching an edge of for example the horizon or a building, it starts to look like a star in a photograph.
The effect of a sunstar depends on the characteristics of a lens and how the aperture blades are designed. Some lenses have a beautiful sunstars while kit lenses often have a sunstar that is very generic or even ‘boring.’
To try and shoot a sunstar, use a small aperture of around f/14 to f/22. This means you close down your lens a lot. It makes sense if you think about it. By closing down your lens, the designs of the blades shapes how the light is coming through them, projecting the sunstar in your image. Try it out!
 By using a narrow aperture of f/14-f/22 when the sun touches an edge, you can create sunstars. Photo by: 'Albert Dros'.
Aperture in Portraits
Blurry Backgrounds!
In portraits, we use a big aperture because we want a blurry background that is not distracting. Shallow depth of field is often pleasing to look at. That’s why we prefer to use a lens that allows us to use these apertures.
If you’re interested in portraits and want a starting out lens with not extremely high price tags, look at prime lenses (you can’t zoom with them). For example, a 50mm f/2 is cheap and delivers great portrait results. Or an 85mm f/2.
Don’t Over Use It!
Just be careful that you don’t overuse these big apertures. Sometimes, the depth of field can be so shallow that only certain parts of the face will be in focus and others are not. While this is sometimes a preferred result, it can also be over doing it!
Depending on the focal length of your lens, experiment with your aperture. If you’re taking portraits outside and have a nice scene as a background, sometimes you don’t want to completely blur this out. So experiment with different apertures and see in which one the background is nice and smooth, but not completely blurred out.
 In some outside situations: control your aperture to get a nice background blur, but keep in mind to make it not too blurred out so you can’t see the environment anymore. Photo by: 'Albert Dros'.
Aperture Priority
Skilled photographers almost always tell you to use the MANUAL mode on your camera. When you start out with photography you tend to use the automatic settings of your camera. Switching to Manual mode is often scary!
Try switching to Aperture Priority mode first. This setting lets you control control the aperture and the camera determines the right shutter speed to get a properly exposed photo. This is very handy in terms of speed and lots of professional photographers use the Aperture Priority mode in the field, simply because shutter speeds during the day don’t matter that much.
Also, by setting the aperture you can control depth of field fast and easy when shooting portraits.
 Shooting in Aperture priority works great during daytime shooting. Let the camera measure the light and don’t care too much about shutter speeds when there is enough light available. Photo by: 'Albert Dros'.
Real World Examples for Inspiration
These examples will help you and (hopefully) inspire you to try out different things with Aperture.
 The Star Tree. Photo by: 'Albert Dros'.
The Star Tree
In this image clever use of stopping down the aperture was used and framing the sun just in between the 2 trees. For these kind of images you have to be fast because the sun is constantly moving. By using a tripod (it can be a bit dark in the forest) and putting your aperture at f/16 or narrower, you can create these beautiful sunstars in the forest. Like mentioned before, it really depends on the characteristics of your lens how your sunstar will turn out. This clean star is a nice property of the Tamron 28-75 Sony FE lens (shot at f/16).
- See also: Ultimate Guide to Forest Photography
Mi Fuego
For this image, a 55mm f/1.8 lens was used. Primes are faster than zooms in general, making them great for using shorter shutter speeds at night. If you require a relatively fast shutter speed at night, like in this case an erupting volcano (if you use a long shutter speed you will lose the texture of lava and smoke), use a fast prime lens. The same goes for aurora shots. This image is about a 6 second exposure, taken wide open at f/1.8.
 Mi Fuego. Photo by: 'Albert Dros'.
Peeking Through
By opening up your aperture and getting very close to objects to use them as a foreground, you can create this beautiful, colourful foreground blur. It works especially well with flowers and plants, as they often have nice colours. Look for colourful trees in autumn, or colourful flowers in spring/summer. Open up your aperture to the max, get close to the foreground and create this magic effect!
 Peeking Through. Photo by: 'Albert Dros'.
The Lonely Tulip
This shot was made by getting super far away from the subject and then zooming in to the maximum with an open aperture. It was shot at 400mm f/5.6 (wide open for that lens). By doing this, you can compress the scene and also get that beautiful background blur that really separates the subject and makes it pop within the image.
 The Lonely Tulip. Photo by: 'Albert Dros'.
Summary
Aperture is one of the most important settings when taking your picture. It determines the amount of light, the depth of field and the sharpness of a picture.
Knowing how to use aperture is very important. But it’s not difficult. By using aperture priority on your camera you very quickly get the feel of it.
The bigger the aperture (smaller the number), the more light comes in and the smaller depth of field you get. This is useful for portraits. In landscapes when we want a lot of things in focus, we often use a smaller aperture (high f-stop number).
Big aperture (low number):
-
Blurry backgrounds in portraits
-
Creative foreground blur in landscapes
-
Milky Way or night sky photography
-
Street photography in low light
-
Creates softness wide open
Small aperture (high number)
-
In general, use around f/11 for landscapes
-
When you want as much in focus as possible
-
Getting creative with sunstars
-
Creates softness at very high numbers, diffraction
This introduction to aperture guide should hopefully get you started quickly with the concept of aperture. And remember, practise makes perfect. Keep shooting and this will get easy very quickly!
About the author: Albert Dros is a landscape photographer based in the Netherlands. You can find more of his work on his website or by following him on Facebook and Instagram.
Learn photography in-field from the landscape photography professionals! Join one of our photography workshops and tours in Iceland!


Other interesting articles

Ultimate Guide to Golden Hour Photography
Whatever kind of photography your are into, whether you are just starting out or you are a veteran photographer, and no matter what kind of camera or lens you use, you should know what the golden ho...Read more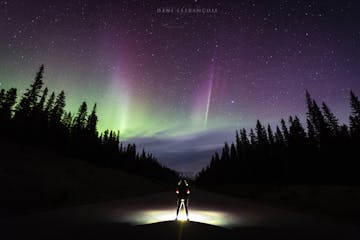
How to Photograph the Stunning Northern Lights Displays in Canada
Imagine yourself standing outside in the cold for hours upon hours and being completely content and happy. That is what it is like to witness and photograph an Aurora Borealis display. Learn all a...Read more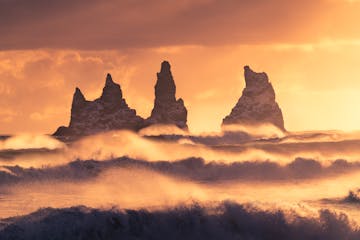
Complete Guide to Photography at Reynisfjara Black Sand Beach
The Reynisfjara black sand beach is one of the best places in Iceland for landscape photography. Situated on the south coast near the small fishing village of Vík í Mýrdal, it has been voted one of...Read more


