
Top 5 Geothermal Areas in Iceland for Photography


Iceland is not only about ice – it is actually one very hot island, with mighty volumes of volcanic pressure hidden beneath its rugged and often stark surface.
- Find out What to Wear for Summer Photo Tours in Iceland
- Discover this Patagonia Summer Photography Tour in Torres del Paine
Shaped by the ferocity of natural forces, it is one of the most dynamic regions in the world, straddling what is known as the Mid-Atlantic Ridge. This ridge is located along the floor of the Atlantic Ocean and makes up the most extensive chain of mountains on Earth. It is an area where the powerful activity of tectonic plates sends forth raging heat and magma to the Earth’s surface.
However, its location underwater means that more than 90% of this mountain range remains hidden from view. There are only a few places on Earth where the Mid-Atlantic Ridge juts out of the surface of the ocean, giving us a glimpse into the depths of our planet; Iceland is one of these.
- See also: Travel Photography Explained
Where to Photograph Geothermal Activity
Iceland’s positioning atop a volatile section of the Mid-Atlantic Ridge makes it a geological phenomenon. The country abounds with geothermal and volcanic activity; subsequently, it yields countless photographic opportunities.
At geothermal and volcanic areas around Iceland, you’ll be able to explore and photograph what usually lays buried beneath the seafloor. The bright side is that rather than descending a thousand leagues beneath the ocean, you’ll be seeing it with your feet firmly planted on dry land!
These areas are easily recognisable by their mysterious landscapes, which offer many opportunities for your photography to take on an intriguing and otherworldly edge. Some of the features include geysers, hot springs, mud pots and fumaroles. The many different shapes and patterns of these features can keep any landscape photographer captivated for hours.
With an abundance of geothermal areas in Iceland to choose from, where do you even start with your photography? To make things a bit easier, we’ve compiled our top five locations in Iceland where you can photograph the depths of the Earth bubbling towards the surface, including our pro tips for photographing geothermal activity at each location. So grab your camera and let’s get started!
#1. Geysir Geothermal Field
Geysir is a large geothermal field on the Golden Circle route of Iceland, home to the famous spouting hot spring of Strokkur. For those who are patient enough to capture it bursting with full force, Strokkur offers once-in-a-lifetime photographic opportunities. Every ten minutes or so, it shoots steam as high as 15-20 metres in the air!
 Strokkur is an incredible erupting fountain geyser in the Geysir geothermal field on the Golden Circle. Photo by: 'Iurie Belegurschi'.
The area is also a prime location for photographing Iceland’s other seething geothermal activity. Geysir is dotted by fumaroles, hot springs and mud-pots, where the soil is vividly coloured by the elements rising from the crust of the Earth itself. These may boil or steam, depending on the weather.
Nearby is an old natural pool which can be entered but is very fragile, so visitors need to take extra care not to disrupt it.
Pro Tips for Shooting at Geysir
When you first arrive at Geysir, watch the intermittent eruptions at Strokkur for a while before you take your camera out to shoot. This will give you time to learn how the geyser works and to think about the different compositional possibilities that are available to you.
Before Strokkur erupts, a bubble will usually appear that is interesting to photograph before it explodes! Usually, the more protracted that the time is between eruptions of steam at Strokkur, the larger and longer the eventuating bubble and spout will be. Wait it out if you want to photograph it when it is at its most robust.
The best way to photograph Strokkur is to use a wide-angle lens and to put something within the frame to give it scale. This could be a person in the foreground, or even yourself. Otherwise, it may not be obvious in photos that the eruption is almost 20 metres high!
When you’ve finally decided on a composition, mount your camera onto a tripod. This will allow you to take sharp and consistent photos. In addition, you might like to use a remote trigger for your shot, as chances are that when Strokkur blows, you will jump! Using a remote will reduce any camera shake, thereby helping you to take clean and crisp images. It also means that you’ll be able to reduce your risk of missing the moment, as you’ll be able to react as soon as the geyser looks like it might blow!
When photographing Strokkur, set your focus point to the base of the geyser, where the steam blows from. Use a fast shutter speed, such as 1/1250, to capture the steam as it bursts forth from the ground. An aperture of around f/5.6-f/7.0 works well here but you can experiment to see what suits you. It is also beneficial to set your camera to continuous shooting mode when Strokkur is erupting, to ensure that you won’t miss the shot.
Be mindful when shooting at Strokkur that what goes up must eventually come down. Depending on the wind direction and where you are standing, you may or may not end up covered in spray. Make sure to wear waterproof clothing and sturdy shoes so as not to slip. You may also want to ensure that your camera is adequately protected by using a camera jacket or plastic bag to keep it dry during the shoot.
#2. Landmannalaugar
Landmannalaugar is a fascinating geological wonder in the Icelandic Highlands. You will have plenty of shooting opportunities here at this geothermal oasis, which is surrounded by piping hot lava fields.
 Landmannalaugar is a steaming geothermal site in the Icelandic Highlands. Photo by: 'Iurie Belegurschi'.
The remote Highland site is beloved for its many steam vents, bubbling pools, hot misty rivers and brightly coloured rhyolite mountains. In fact, the different shades and colours of the mountains make them appear as though they’ve been painted.
With so much to offer, it’s no wonder that Landmannalaugar is a paradise for hikers and photographers alike.
- See also: Private Landmannalaugar Photo Tour
Pro Tips for Shooting at Landmannalaugar
There is a lot to photograph at Landmannalaugar and many different compositions to be found, so don’t just stand in one position! Move around, explore different spots and try out different angles. Trek through the lava field, where you will find photo opportunities in all directions. Lava may be difficult to compose but you will find plenty of good foreground opportunities, from mossy rocks to different geological structures.
Using a wide-angle lens at Landmannalaugar will allow you to capture the vast and impressive scenes, though switching it up to a telephoto once-in-a-while will enable you to focus on abstract patterns within the landscape instead. As always, check what is in your foreground, as it will help you give scale to the enormity of the area.
Try using a mid-length lens in the lava field, such as a 24-70mm, to compress the scene and allow it to fill your frame. This trick is particularly useful when the mountains in the background of your shot are not very tall.
#3. Hveravellir
Located between the mighty glaciers of Hofsjökull and Langjökull, deep in the central Highlands of Iceland, Hveravellir is the largest geothermal area in Iceland. It represents a veritable hotspot of bubbling pools, steaming cinders, and hills brightly coloured by the elements rising from the centre of the earth. This area is particularly photogenic and has even been called the most beautiful geothermal area in Iceland.
 Hveravellir is an extraordinary geothermal field, full of multi coloured mud pools. Photo by: 'Iceland Photo Tours'.
The boiling mud pools at Hveravellir are multi-coloured, resulting in some very interesting photographic opportunities. The nearby lava field of Kjalhraun is a photographer’s delight, where the landscape takes on all kinds of forms and structures, giving a glimpse into what the Earth would look like if it were to just crack and open up.
Pro Tips for Shooting at Hveravellir
When photographing the Hveravellir hot springs, observe the direction and the strength of the steam in the area first. If the steam is widespread and moving slowly, try to avoid long exposures, as this will lead to white and flat images. However, if the wind is strong, then a longer exposure can create a surreal, wispy effect with the steam.
Using graduated filters in this area will also allow you to slow down your shutter speed and correctly expose for a bright sky.
If it rains or you have cloudy skies during your trip to Hveravellir, don’t put your camera away! This is a great time to photograph the geothermal features. The dark skies can add an ominous look to your photos, bringing out the electric blue colouring of the hot springs.
The middle of the day is also an ideal time to photograph the hot springs or geothermal pools in Hveravellir, as the sun reaches deep into the water and brings out the brilliancy of the colours. Using a polariser filter here can reduce glare and enhance the colours even further.
- See also: How to Take Great Photos in Bad Weather
#4. Kerlingarfjöll
Kerlingarfjöll is an impressive mountain range, reaching a height of roughly 1500 metres. It is located in the central Highlands of Iceland, providing spectacular opportunities for photography with dramatic volcanic and highly colourful rhyolite mountains set on a background of barren desert.
Depending on the lighting conditions, the mystical mountains may appear to glow different shades of red and yellow.
 The Kerlingarfjoll mountain range looks like it is from another planet. Photo by: 'Iurie Belegurschi'.
There are three geothermal areas belonging to Kerlingarfjöll, of which Hveradalir is the most well-known. It is a fascinating and colourful area in its own right, where the geothermal activity bathes the ground in colours of red, green and yellow.
There are also many hot springs, solfataras and fumaroles around, as well as a number of alkaline springs. The entire area is a photogenic wonder; breathtaking in its beauty and diversity, it is not to be missed by anyone who loves a great view and taking great photos.
Pro Tips for Shooting at Kerlingarfjöll
The mountains at Kerlingarfjöll are best photographed during dawn and dusk in the midsummer, when the rays of the Midnight Sun enhance their colours, adding further splendour and variety to the scene. This will also result in the colourful mountains standing out, contrasted by the dark colours that otherwise dominate the area.
It is worth taking your time at Kerlingarfjöll to look for compositions. An interesting foreground will add another dimension to the scene, as well as provide a sense of scale.
Otherworldly images can be made of the mountains, especially with dark, stormy looking skies. If the sky is not interesting, then try leaving it out of the frame altogether.
- See also: Summer Workshops in Iceland
#5. Námafjall
The colourful geothermal area of Námafjall lays just east of Mývatn in North Iceland and is also known as Hverarönd or Hverir.
At this fascinating field, you will find a wealth of incredible sites to photograph beneath the Midnight Sun, including boiling mud pots and solfataras with multicoloured sulphur crystals decorating the scene.
 Namafjall is easy to access in the north of Iceland. Photo by: 'Iurie Belegurschi'.
The landscape at Námafjall gives a rare glimpse into what the Earth may have been like when it was first formed. There is so much to see and photograph in this area, including Krafla, a caldera about 10 km in diameter that includes the Víti Crater with its green lake.
Not far from the lake is the steaming hot Námaskarð Pass, where you’ll have the opportunity to shoot the churning mud pools, seething fumaroles and colourful contrasts in the earth. Here, there are even more examples of Iceland’s volcanic history strewn across the lava fields, pseudo-craters and dormant peaks.
Pro Tips for Shooting at Námafjall
The perfect opportunity for capturing extreme contrasts and textures at Námafjall is when the light is soft and golden under the glow of the Midnight Sun.
Take your time composing the mud pots here as they boil and bubble. Try framing the mud pots with solfataras, which create endless mystical photographic opportunities.
The light at Námafjall can change very quickly, so be sure to keep your camera out and to use a wide-angle lens to capture the steamy expanse in all its entirety.
While Námafjall is a highly photogenic area, it does give off a lot of hot stream, as well as a strong sulphur smell, so please take caution when visiting.
Staying Safe When Photographing Geothermal Activity
Now that you’ve got the lowdown on photographing geothermal and volcanic areas in Iceland, let’s talk about staying safe and alive. When visiting these sites, it is important to put your safety first.
Lava fields are inherently risky places to visit, so be sure to wear sturdy footwear and to keep to marked paths. Stand clear of bubbling mud pots, unless you fancy yourself falling in. No place on Earth is worth risking your own life for a shot.
Getting out and about in the Icelandic Highlands to these geothermal areas can be tricky in itself, with some places being accessible only with a super jeep.
Take the headache out of planning and let us do it for you at Iceland Photo Tours! We have a number of photography workshops to the Highlands running throughout the year, bringing you directly to these wonderful geothermal sites and ensuring that you’ll be able to concentrate on your photography.
About the author: Serena Dzenis is a landscape photographer based in Iceland. You can find more of her work on her website or by following her on Facebook and Instagram.
Are you ready to immerse yourself in the steaming geothermal areas of Iceland? Check out our 7 Must See Landscape Photography Locations in the Icelandic Highlands!


Other interesting articles

Ultimate Guide to Focus Stacking
You’ve heard of it. You’ve done some research about it. You have felt overwhelmed by it. There are legends which cause some people to shiver just by hearing someone talk about it. Yes, you probably...Read more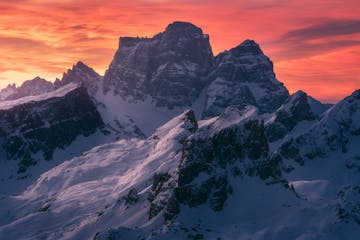
Beginner's Guide to Post Processing Landscape Photography
Whether you like it or not, photos need to be post-processed. I won’t even get into the fact that it’s always been like this, since analogue film cameras were in their heyday. Back then, there was j...Read more
What is a Photography Style and How to Find Yours
I believe it was Charles Bukowski, the controversial author and poet, who once said, “It’s better to do a dull thing with style than a dangerous thing without it.” Regardless of your inclinations (o...Read more


